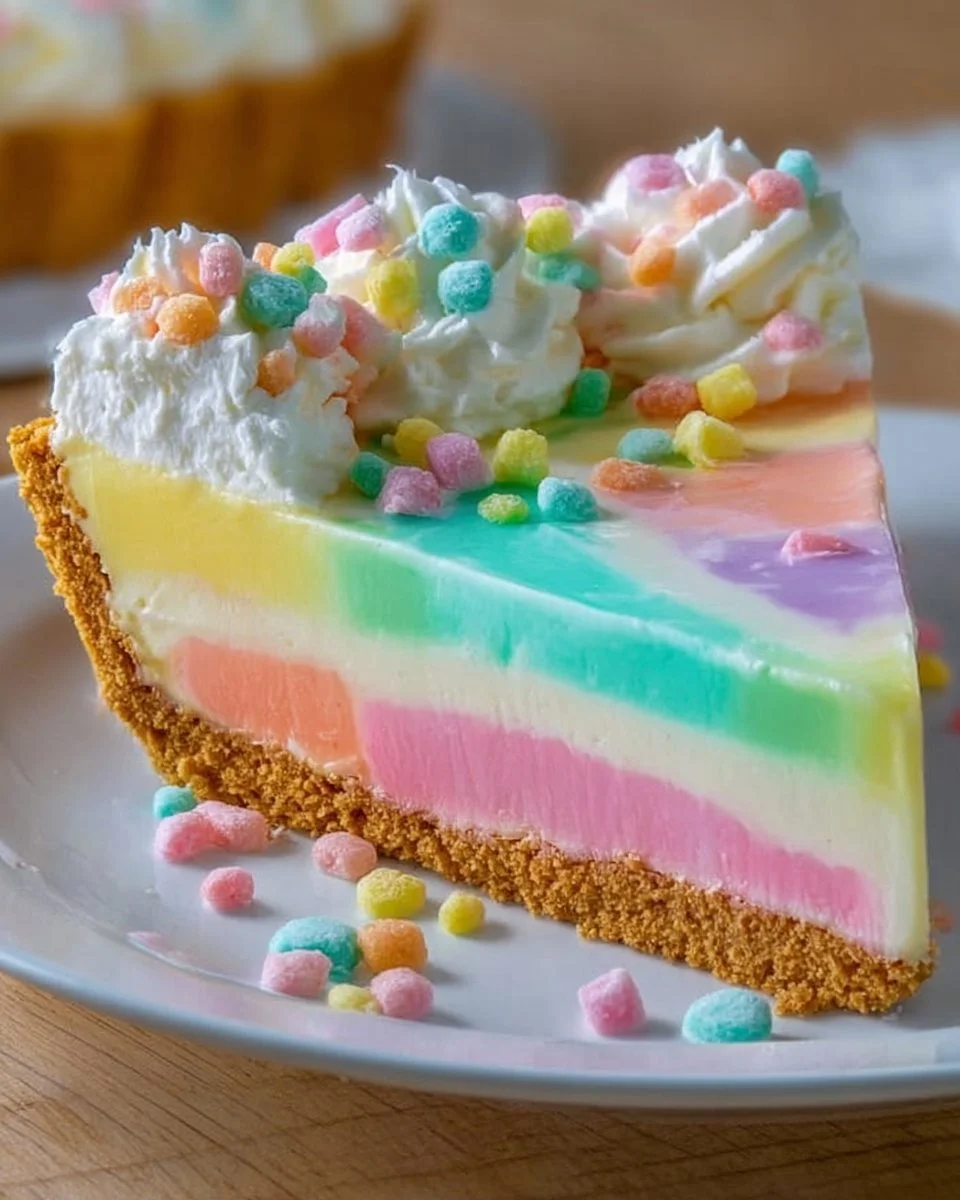
Easter mornings bloom with joy and laughter, filled with pastel colors and sweet treats, but there’s one dessert that steals the show time and time again—Easter No Bake Jello Pie. Imagine this: a vibrantly layered masterpiece glowing with colors that evoke the spirit of spring. You approach it slowly, entranced by the shimmering jiggly beauty atop a delicate graham cracker crust, a combination that promises a delightful crunch at first bite. The air fills with the sweet scent of vanilla and fruity notes, whispering of the deliciousness that awaits. With each forkful, you’re greeted by a heavenly blend of creamy, tangy cream cheese, cool and refreshing Jello, and the lightest dollop of whipped topping. It’s a taste that dances on your palate, bringing both nostalgia and pure delight.
As you set the table, the pie sings to you with its playful hues—bold reds, sunny yellows, and lush greens, all pulsating with life. Each layer tells a story, revealing a world of flavors as you dig deeper. It beckons you to share it with loved ones, transforming any gathering into a celebration of flavors and delightful textures. Easter No Bake Jello Pie is more than just a dessert; it’s a cherished memory waiting to happen.
Why You’ll Love This Easter No Bake Jello Pie
This iconic dessert stands out not only for its bright and cheerful presentation but also for its incredible versatility. The layers of flavor tantalize your taste buds, making every slice an adventure. Whether you’re serving it at an Easter brunch, a family picnic, or simply enjoying it on a sunny afternoon, this pie fits seamlessly into any occasion. Its no-bake nature invites you to create without the stress of oven timers and messy cleanup. What’s more, it’s surprisingly easy to customize! You can play with the colors and flavors of Jello, allowing your creativity to shine and ensuring that it mirrors any celebration’s theme perfectly.
Beyond aesthetics, the joy intensifies with each mouthful—the crunch of the graham cracker crust contrasts delightfully with the creaminess of the filling and the soft wiggle of the Jello. Each flavor harmonizes like a lovely tune, making this pie not just a treat for the eyes but a symphony for the senses. It delights not only the sweet-toothed but also those who relish refreshing citrus notes on a warm day. Simple to prepare yet impressively robust in flavor, your friends and family will be asking for seconds—and maybe even thirds!
Preparation Phase & Tools to Use
Before diving into this delightful creation, gather your essential tools. They make the preparation process smooth and enjoyable, so you can focus on what really matters—creating blissful layers of flavor.
- Mixing Bowls: A large mixing bowl and a medium bowl are vital for combining your cream cheese and Jello mixtures. Opt for glass or stainless steel for easy mixing and cleaning.
- Electric Mixer: This tool saves you a great deal of muscle and ensures fluffy cream cheese. It whips the mixture into the perfect airy consistency without losing your enthusiasm!
- Spatula: A silicone or rubber spatula helps you easily spread the cream cheese layer without disturbing the Jello. It’s excellent for scraping down the sides of your mixing bowls.
- Measuring Cups and Spoons: Accurate measurements yield the best results, ensuring the flavors balance perfectly.
- Refrigerator: The key to this no-bake pie lies in chilling. You must have enough fridge space to allow the pie to set fully and maintain its delightful structure.
- Pie Plate: A clear glass pie dish lets your beautiful layers shine through and makes serving effortless.
Preparation Tips:
- Soften your cream cheese to room temperature before mixing for optimal creaminess.
- Chill your mixing bowls for a few minutes in the freezer beforehand to help the whipped topping hold its shape and provide a refreshing sensation when enjoyed.
Ingredients for Easter No Bake Jello Pie
Creating your vibrant masterpiece requires a handful of colorful and delicious ingredients:
-
Graham Cracker Crust: (1 pre-made 9-inch crust or ingredients to make your own) – The perfect base for the creamy filling and Jello layers, offering a delightful textural contrast that pairs beautifully with the sweet layers above.
-
Cream Cheese: (8 ounces, softened) – Forms the rich and tangy creamy layer, adding depth of flavor and a smooth, melt-in-your-mouth texture to the pie.
-
Granulated Sugar: (1/2 cup) – Sweetens the cream cheese layer, balancing the tartness and enhancing the overall flavor profile of the pie.
-
Vanilla Extract: (1 teaspoon) – Enhances the sweetness of the cream cheese layer and adds a subtle, warm aroma that invites everyone to dig in.
-
Boiling Water: (1 cup) – Used to dissolve the Jello powder, ensuring it sets properly and creates a vibrant, jiggly layer.
-
Cold Water: (1 cup) – Added to the dissolved Jello mixture to cool it down quickly and expedite the setting process. This ingredient is key to achieving that desired texture.
-
Jello (Various Flavors and Colors): (2 small boxes, 3 ounces each, assorted colors like lemon, lime, raspberry, or strawberry) – The stars of the show, vibrant, fruity goodies that bring both color and flavor complexity, elevating our pie to new heights.
-
Whipped Topping: (8 ounces, thawed) – Adds a light, airy touch that complements the creamy and fruity layers, striking the perfect balance while making the pie visually appealing.
-
Optional Easter Candies or Sprinkles: (For decoration) – Add extra Easter flair and visual appeal, making the pie even more festive and celebratory.
When preparing, feel free to experiment! Substitute your favorite cookie for the crust, or swap different Jello flavors to create your unique culinary masterpiece.
How to Make Easter No Bake Jello Pie
Crafting this vibrant pie involves several exciting steps, each building upon the last to create a dreamy dessert.
-
Prepare the Cream Cheese Layer: In a large mixing bowl, beat the softened cream cheese with an electric mixer until smooth and creamy. This ensures a lump-free, velvety base for your pie.
-
Sweeten and Flavor the Cream Cheese: Gradually add the granulated sugar to the cream cheese, continuing to mix until the mixture is light and fluffy. This crucial step balances the flavors. Stir in the vanilla extract to envelop the mixture in warmth and sweetness.
-
Prepare the First Jello Layer: In a separate medium bowl, pour in one box of Jello powder of your choice. Add 1 cup of boiling water and stir continuously until the powder dissolves completely, ensuring no granules remain for a silky finish.
-
Cool the First Jello Layer: Mix in 1 cup of cold water to the dissolved Jello. This crucial step cools it down and initiates the setting process.
-
Pour the First Jello Layer: Carefully pour half of the prepared Jello mixture into the graham cracker crust. This creates the first layer; do not forget to save the other half for later!
-
Chill the First Jello Layer: Place the pie in the refrigerator for about 30-45 minutes. Chill until the first layer is partially set yet still slightly jiggly. This is essential for a clean separation from the cream cheese layer.
-
Spread the Cream Cheese Layer: Once the Jello layer is ready, gently spread the cream cheese mixture evenly over the top using a spatula or the back of a spoon for a smooth finish.
-
Chill the Cream Cheese Layer: Return the pie to the refrigerator, chilling again for another 30-45 minutes, or until the cream cheese layer solidifies enough to support the next Jello layer.
-
Prepare the Second Jello Layer: While waiting, prepare the second Jello layer using the remaining box of Jello powder. Follow the same steps as before—add boiling water, mix, cool, and set aside.
-
Pour the Second Jello Layer: Once the cream cheese layer is firm, carefully pour the remaining Jello mixture over it. Do this slowly to preserve the beautiful layers formed below.
-
Chill the Pie Completely: Refrigerate the pie for at least 4-6 hours, or ideally overnight, to allow all the layers to set completely. This longer chilling ensures the pie holds its shape when sliced, tantalizing everyone with the vibrant colors.
-
Decorate and Serve: Just before serving, spread the thawed whipped topping evenly over the top of the pie. Opt to decorate with Easter candies or sprinkles for an added festive flair and visual appeal. Slice and serve chilled, savoring the delightful layers and refreshing flavors.
Chef’s Notes & Helpful Tips
-
Make-Ahead Tips: This pie shines when made the day before serving. Prepare it in advance to allow ample chilling time, giving you more room to enjoy your celebration.
-
Cooking Alternatives: While this is a no-bake pie, you could consider pre-baking the crust for a crispier base—though it might add a bit more complexity if you want that classic taste.
-
Customization Ideas: Feel free to get creative with your flavors! Substitute different varieties of Jello based on seasonal availability or personal preferences. You can even fold in fruits like strawberries or blueberries into the cream cheese layer for added texture!
Common Mistakes to Avoid
One of the most common pitfalls with layer pies involves mixing the layers too quickly, which can lead to them blending together instead of creating distinct levels. To avoid this, ensure each layer sets adequately before adding the next. Another mistake is not chilling thoroughly; if you slice the pie too early or do not give enough time for setting, the layers may meld. Finally, remember to gently pour your Jello mixtures to preserve the integrity of the layers beneath—it’s a delicate dance of flavor and color!
What to Serve With Easter No Bake Jello Pie
Delightful desserts often sparkle best when they have friends along the way. Consider pairing your Easter No Bake Jello Pie with:
-
Fresh Berries: Serve a refreshing assortment of strawberries, blueberries, and raspberries alongside for a tart counterpoint to the pie’s sweetness.
-
Whipped Cream: Offer extra whipped cream for those who wish to indulge in a cloud-like experience with each slice.
-
Chocolate Eggs: Complement the fruity flavors with a touch of rich chocolate, nodding to the season’s egg-related themes.
-
Coconut Macaroons: Their chewy texture and tropical coconut flavor create a delightful contrast to the creamy pie.
-
Ice Cream: A scoop of vanilla or lemon sorbet alongside the pie adds a luscious richness that enhances every layer of flavor.
-
Fruit Salad: A light and airy fruit salad, dressed with a sprinkle of mint, adds a refreshing touch that brightens your table.
-
Coffee or Iced Tea: A warm cup of coffee or chilled iced tea serves as a lovely beverage pairing, balancing sweetness with refreshing varieties.
Storage & Reheating Instructions
Store your Easter No Bake Jello Pie in the refrigerator for up to 3 days, tightly covered to maintain freshness. It holds up remarkably well, keeping its delightful layers intact. While technically, there’s no need for reheating, if you have leftovers, simply serve cold or at room temperature for the best texture.
Estimated Nutrition Information
While the exact values can vary, the approximate nutrition per slice (based on 12 servings) is:
- Calories: 210
- Total Fat: 10g
- Saturated Fat: 5g
- Cholesterol: 25mg
- Sodium: 160mg
- Total Carbohydrates: 29g
- Dietary Fiber: 0g
- Sugars: 15g
- Protein: 2g
This is an estimate, and individual results may vary based on specific ingredient choices.
FAQs
Can I use sugar-free Jello?
Absolutely! You can swap in sugar-free Jello for a version that contains lower calories. Just be aware that it may alter the texture slightly, depending on the brand.
How long will the pie keep in the fridge?
The pie can last in the refrigerator covered for up to 3 days. However, for the freshest experience, enjoying it within 24-48 hours is best.
Can I make this pie gluten-free?
Yes! Use a gluten-free graham cracker crust or create a homemade crust with ground almonds or gluten-free cookies. It’s a delightful way to share this treat with friends who have dietary restrictions.
What if I don’t have an electric mixer?
You can still make this pie! A good old-fashioned whisk will work; just be prepared for a bit of arm workout time to achieve that fluffy texture.
Can I freeze the pie?
While this pie is best enjoyed fresh, you can freeze it! Just remember to wrap it well and allow it to thaw in the fridge for several hours before serving. This freeze may alter the texture slightly but will still delight your taste buds!
Conclusion
As the colors of spring emerge and hint at the joy of new beginnings, let the Easter No Bake Jello Pie be the centerpiece of your celebration. Celebrated for its beauty, flavor, and ease, it invites laughter, togetherness, and joy with each slice. The vibrant layers harmonize in a way that captures the very essence of Easter, mirroring the joy of the season. Bring this lively creation to your table, and watch as it transforms ordinary gatherings into hearty celebrations. So gather your loved ones, prepare your vibrant layers, and dive into a pie of excitement and flavor—you won’t be able to help but share a slice of happiness!
Print
Easter No Bake Jello Pie
- Prep Time: 20 minutes
- Cook Time: 0 minutes
- Total Time: 420 minutes
- Yield: 12 servings 1x
- Category: Dessert
- Method: No-Bake
- Cuisine: American
- Diet: Vegetarian
Description
A vibrant and delicious no-bake pie layered with Jello over a creamy filling, perfect for Easter celebrations.
Ingredients
- 1 pre-made 9-inch Graham Cracker Crust
- 8 ounces Cream Cheese, softened
- 1/2 cup Granulated Sugar
- 1 teaspoon Vanilla Extract
- 1 cup Boiling Water
- 1 cup Cold Water
- 2 small boxes Jello (3 ounces each, various flavors and colors)
- 8 ounces Whipped Topping, thawed
- Optional Easter Candies or Sprinkles for decoration
Instructions
- In a large mixing bowl, beat the softened cream cheese until smooth and creamy.
- Add granulated sugar and mix until light and fluffy; stir in vanilla extract.
- In a medium bowl, dissolve one box of Jello powder in 1 cup of boiling water, then mix in 1 cup of cold water.
- Pour half of this Jello mixture into the Graham Cracker crust and chill until partially set (30-45 minutes).
- Spread the cream cheese layer over the set Jello layer and chill again (30-45 minutes).
- Prepare the second Jello layer using the remaining box of Jello powder, then pour over the cream cheese layer and refrigerate for 4-6 hours or overnight.
- Before serving, spread whipped topping over the pie and decorate with candies or sprinkles.
Notes
For best results, make the pie a day before serving to ensure adequate chilling time. Customize your Jello flavors to suit your preferences.
Nutrition
- Serving Size: 1 slice
- Calories: 210
- Sugar: 15g
- Sodium: 160mg
- Fat: 10g
- Saturated Fat: 5g
- Unsaturated Fat: 3g
- Trans Fat: 0g
- Carbohydrates: 29g
- Fiber: 0g
- Protein: 2g
- Cholesterol: 25mg